Sunday, July 24, 2011

Gardevoir Part 1

I was gonna try something similar to Mewtwo, but different as well. First off, its Gardevoir from Pokemon again and from generation 3 or something I don't know...All I know is that its a rare pokemon that I always sought to get by catching Ralts (the pre-evolution form). Its yet another Psychic-type. (My favorite type)


But what will be different from Mewtwo this time around is that Gardevoir will allow me to experiment with hair (not the dynamic hair but a solid hair piece) as well as female body figure and clothes. I am also debating on whether to add a movable mouth.

 Looks feminine enough? Not worrying too much about the nose since...there is hair...


Saturday, July 23, 2011

Mewtwo

This project doesn't count as "A History" since I had only just finished it this week.

I am very very proud to present: Mewtwo. A Pokemon.


This took me about a month on and off to work on completely. Needless to say, I am very proud of it. I made less mistakes and put more effort in the process of the work than the result, which to me is more important in the long run.

For this model, I started with the head then immediately built the body. The torso was by far the most difficult part because of its odd shape and the fact that his legs emerge from the side of his waist instead of straight down like a human (not that he is anyway).
 Base model with Turbosmooth

To make him stand out a little, I messed around with lighting up the area.
I also added eyes. This one is what kept me from adding proper eyes to the other models like Cooler or the Protoss. The models physically could not support perfectly spherical eyes. If they were too big only to fit the eye socket, some of the eye mesh would stick out of the forehead or the temple. Why did I want eyes to work properly? To have him look around of course! To have him properly look around, the eyes need to rotate. Another way was to physically move the texture on the eyeball but that is much more tedious and rather stupid. So how do you work an eye that is 1) not spherical, 2) must be kept from accidentally moving out of the head during a rotation, 3) and kept that non-spherical shape throughout. I did some research and found an idea on a forum. By using a FFD (free-form deformation) spacewarp! In layman's terms, as far as my knowledge goes, the FFD adds puppet strings to an object in the form of a grid and you control the puppet strings using the vertices of the grid which deforms the object. By encasing the eye inside the grid-box of the FFD and the sphere bound to the FFD, I squished the FFD which in turn squished the eye to an elliptical shape. The result is that rotating the eye will not affect the shape. Sure the vertices move in the rotation but it will always keep the same elliptical shape in the same direction.The last thing to it was to create a dummy object and bind the eyes to the dummy with a LookAt modifier, so I can move the dummy and the eyes will look in the direction of the dummy. Great success!

Thinking back, it actually did not take me long to get the base model down. It took perhaps half a week on and off. The UVs for this guy were much more simple since there was not much to him in terms of color.
So the UVs were done fairly quickly and surprisingly cleanly for the most part. Then I slapped on some temporary coloring work to see how he looked.


Gettin dat close-up.

What next? ZBRUSH! I put in some detailing work, adding muscle and some skin while trying to retain the fact that he is not a physical fighter. He has muscle, but he is also skinny as a rail. Despite having massive thighs. Exported a bump map as well as an updated base model from Zbrush and came back into Max. This time I put the bump map in the correct map channel...the Normal Map. 

Details aren't as pronounced as in Zbrush but that is expected since it is a bump map and not physical deformations that make the details.

I also updated the coloring. It is not much, but still...
I rigged him to be ready for posing. Throughout the few poses I made of him, I was able to find and iron out artifacts. 
 A more classic pose, based on the official art at the top of this post.
 Another pose, messed around with some shadow-ball stuff. Fixed a lot of artifacts in his legs.

 
Technically this was the very first pose only to stretch him out and test all of the bones to get rid of any inconsistencies and artifacts. That neck...I know...I ironed out most of that in later poses...

When posing for Mewtwo, I actually found my brain. Instead of posing him in Zbrush, I posed him in 3ds Max then exported the pose into Zbrush on top of the detailed model, so he kept the details and everything while in the pose. Why did I not think of this before? Seriously...


I built 3 platforms for him, 1 of which was scrapped and the other 2 are final. 1is quite plainly the best: the Pokeball. The other is based on the stage Mewtwo came down in in the first Pokemon movie, Mewtwo Strikes Back.

The Stage

The PokePlatform
"I now claim my prize...Your Pokemon."


Prepare yourself.

And finally. It all ends here. (Don't forget I also did the turntable video at the top!)


Friday, July 22, 2011

A History: Cooler

My second project came as a burst of inspiration watching a Dragonball Z movie called Cooler's Revenge. I had so many ideals to make a model of Cooler that I couldn't wait!
Same thing as before I opened up Max and started building the head first thing then moved on to the rest of the body. May be a terrible way to go about making a humanoid model, from head down instead of head separate from the torso, but I find it easiest that way.
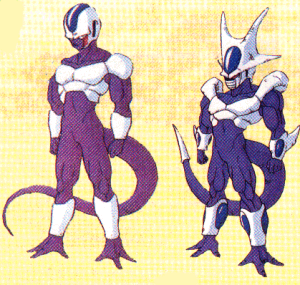
There was 1 thing I really wanted to do however. He had two forms in the movie.

The form on the left is what I started to make. I figure that I wanted to make a transformation animation or something since I really love that 2nd form right after.

After building the base model, I set off creating the 2nd form by using a copy of the base model. Later on I would use this 2nd form as a morph target. By using the same number of vertices with the same properties as the original, only they are moved from their original positions, a morph modifier will allow the 1st form to morph into the 2nd form. I made a copy of the original 1st form body so I will be able to make a morph target for each the arms, tail, legs, chest, and head. With this I am able to control what is transformed (the arms, legs, head, etc individually) and how "much" the vertices are moving to position of the 2nd form.


That was fairly easy compared to what I had to do with the mouth. In the movie, the mouth guard comes in in a pretty badass way. The guard comes out from under the chin and jaw to over his mouth then some locking pieces from the sides move out and locks into place as you can see in the above vid.
I didn't really know how to do it in any other way SO I, being so smart, decided to do it in the most painful way possible. I animated the mouth guard VERTEX BY VERTEX. It was stupid, painful, was the only way I knew how, but yet it still came out gloriously. Whodathunkit?


After, I did some painful UVs and threw it into Zbrush for some fun.
ZBrUsH OmG FuN TiEMz!

 Unfortunately, I started to lose interest in continuing working on Cooler so I started to wrap things up...which left the transformed Cooler and the animation untouched.
I built a quick platform, posed him painfully in Zbrush (dont know why I still did it then, but I know of a MUCH better way today), and rendered him out with some post work with Photoshop.


The platform sucks.

Tuesday, July 19, 2011

A History: Protoss

The Protoss design by Blizzard for their game Starcraft has been amazing to see. The armor, the culture, the vehicles and technology has a distinct touch to them that essentially says that the Protoss are powerful, so very advanced and far from any "human" design (yet still designed by Blizzard humans...shut up). Smooth, organic and yet alien. Tis gorgeous.

This project is from 2-3 years ago, according to the last time I had touched the .Max files. Time flies honestly.

Creating a Protoss character was probably my first major character project. Unfortunately I do not remember exactly how long it took me from start to end as I had worked on it on and off for quite some time. 

Opened 3D Studio Max, my favorite 3d application. I like it more than Maya, which I am sure to some is blasphemy...

SO. My main method here was box modeling. Its my favorite method of character creation.

Its also the only method I really know...

But nevermind that! I started out with a simple box with a single goal in mind: To build a Protoss head.
Again, unfortunately I should show some pictures of said work in progress but...I seem to have lost most of the original files somewhere on my back-up hard drive.

The head went well. Sometime after that I decided to expand on the head and build a body. And thus it became true.
One thing I am really hating myself for right now is my total lack of organization. In the process of writing this, I am also searching for anything that has to do with the Protoss. I am finding this crap all over the place and best part about it is that I overwrite the files WIP.png a bajillion times so I really don't early pictures.
First came the body. Nothing special, except it was quite...naked without any armor. Base mesh was complete, melted my brain over dealing with UVs (I hate UVs, most artists do I bet, yet I was such a noob at the time of my Protoss that it took me ungodly amounts of time to fully unwrap it; now I am finding out new quick things), and put the model into Zbrush.
Whenever I create a model, I love the time when I can use Zbrush. It is very fun for me, being able to flesh out my model in such major detail that it just is damn beautiful to do.


Oh look what I dug up! Amazingly I had found this in my back-up drive in the old "desktop" folder. Unfortunately I was such a noob that I had not used Photoshop to do any actual texturing, choosing instead to "polypaint" it straight in Zbrush. Again I was not very smart so the coloring job looks ugly as sin. I also did not know how to work the "movie" function in zbrush at the time either...hence the quick turntable with only a few frames. Impatient? Hell if I know.

I tried exporting a bump map of the high resolution details to the low poly model in 3ds max but the Zmapper seemed to spit out some horrendous maps. That and it did not help that when I did put the texture on the low poly model I did not have the bump map picture be added as a normal map in the bump map channel of the material. I had added it as a bitmap...a regular picture so the bump map picture was interpreted as full of SUCK.

By the way, see how it was posed? I don't remember posing it in 3DS Max. I posed it in Zbrush. Which...Is probably MUCH more stupid than you might think. In 3DS Max I had the luxury of a quick bone system to pose with. NOPE! I chose the hard way of masking out certain parts of the body and rotating them in Zbrush.I remember how fun that was... -_- 


After that I think I took a small break, then decided to throw on some armor. So back in 3D Studio Max I go. Once again working off the base mesh of the naked Protoss, I grabbed some Protoss fan-art and official artwork from Blizzard and set to work.

There is the base model straight from 3ds max. Ambient Occlusion rendering.

Personally, I don't like how I designed it. The chest I believe is perfect. Arm bracers...Hate them. Feet...Wtf happened to actual BOOTS? The shin guards are fine. Thigh armor...That is iffy.

Next I threw it back in Zbrush. UVs I probably dgaf'd, cause I hated them.
 Front!
Back!
You might be wondering if I colored it...

Based on previous results...NO. Oh well! My adventure with the Protoss is over.

I remember having so much PAIN doing some of the work. But eventually it was finished.
-Insert expletive here- as I remember how PAINFUL it was to do the UVs...